Week 18 & 19
Written on December 20th, 2023 by Laura Weller
After my first steps on the 3D printer I decided to start experimenting with the paste based on cellulose. I created a method where I made a very smooth paste to put in the 3D printer. On top of that I created a smooth surface to print on and I 3D printed different nozzle sizes. On top of that I set up a documentation page for De Waag on how to work with the 3D printer. This documentation can also be found here below.
The documentation is set up in 3 parts:
- Pronterface & Biomaterials: this section contains all the information on the preparation on printing
- How to use: this section contains all the information on how top use the machine once you have the preparations done
- My outcomes and process in writing this documentation
Pronterface & Biomaterials
General information
As of 2023 this printer has been changed into a dedicated biomaterial 3D printer. On this page you can read more about biomaterials and the setup of the software to use the printer. On the How to Use page you can find more information on how to use the printer once you have installed the software and have prepared the recipes for the biomaterials.
Biofabricated material
To work with the biomaterial 3D printer, you have to prepare a biomaterial paste as a material. A biomaterial is a term used to indicate materials that have non-specific biological association. If you start printing with biomaterial, you will be making a biofabricated material. Biofabricated materials are produced by living cells (e.g. mammalian) and microorganisms such as bacteria, yeast and mycelium. The material exists out of biofabricated ingredients (living cells and microorganisms such as bacteria, protein, etc.) that are afterward mechanically or chemically processed in order to make a macroscale material structure. This processing can be done through yarn spinning, 3d printing, laser cutting, and many more (Biofabricate and Fashion for Good, 2020). To understand the relation of biomaterials and biofabricated materials better, Fashion for Good and Biofabricate (2020) have created a chart to show the term biomaterials and everything that it includes.

To make a paste for the biomaterial 3D printer, you need to start with what you would like to print. If you want to make a 3D model with some height, you need a thick paste. If you want to print more laced patterns, you can use a more liquid paste. I recommend trying out your material first by putting it in a plastic bag and cutting off a little corner. Now you can see how the paste you make behaves when pushing it out an opening. Try to create something similar that you want the 3D printer to create and see whether that would work with the paste you have made. Let the test dry and see the outcome. If the outcome of the test meets your wishes, start moving towards the 3D printer. When you start making the paste for the 3D printer, a paste of 250/300 ml will be enough to start testing.
After deciding what to print, you also need to think about the size of the nozzle that you want to print with. The 3D printer has 5 different sizes: 6mm, 5mm, 4mm, 3mm and 2mm thickness. Depending on the size of the nozzle, your material needs to adapt. The thicker your material, the bigger nozzle you need to use.
For recipes on biomaterials, have a look at:
Pronterface
To work with the biomaterial printer, you have to download Pronterface. Pronterface is a free, open-source software, licensed under the GNU General Public License, version 3. The software allows you to send code directly to the printer. This means that, whereas with a normal 3D printer you would slice your 3D object and let a programm such as Ultimaker Cura or Prusa Slicer create a .gcode file to put on a usb/sd card which then in turn gets inserted in the printer, you can now copy paste this .gcode in the Pronterface software and let the software directly send the code to the printer. This is convenient since it will buy you time. Depending on your biomaterial, your settings of the printer are different. Think about how fast the head of the printer needs to move, how much pressure you need to put on the material to extrude, how high it needs to be calibrated from the bed to extrude the right amount of material, etc. When you are trying out a new biomaterial, your setting will be different. Directly changing this on Pronterface and sending that to the printer will buy you time. While using an usb or sd card in between will take much going back and forth between the laptop and the printer.
Steps Pronterface
To set up Pronterface and the printer correctly, please follow the steps below:
-
Open Pronterface. When you have Windows, this will automatically happen when clicking on it. When you have Mac, you need to right click and then click open. You will get a pop up menu where you have to allow Pronterface to run on your Mac, after that it can open. Double click on the programm will not do the trick when having Mac, it will then give a pop up menu that states that “The application “pronterface” can’t be opened”.
-
Now that you have Pronterface installed and it works on your laptop, close it again.
-
Give the 3D printer power and turn it on. Connect the 3D printer via usb cable to your laptop.
-
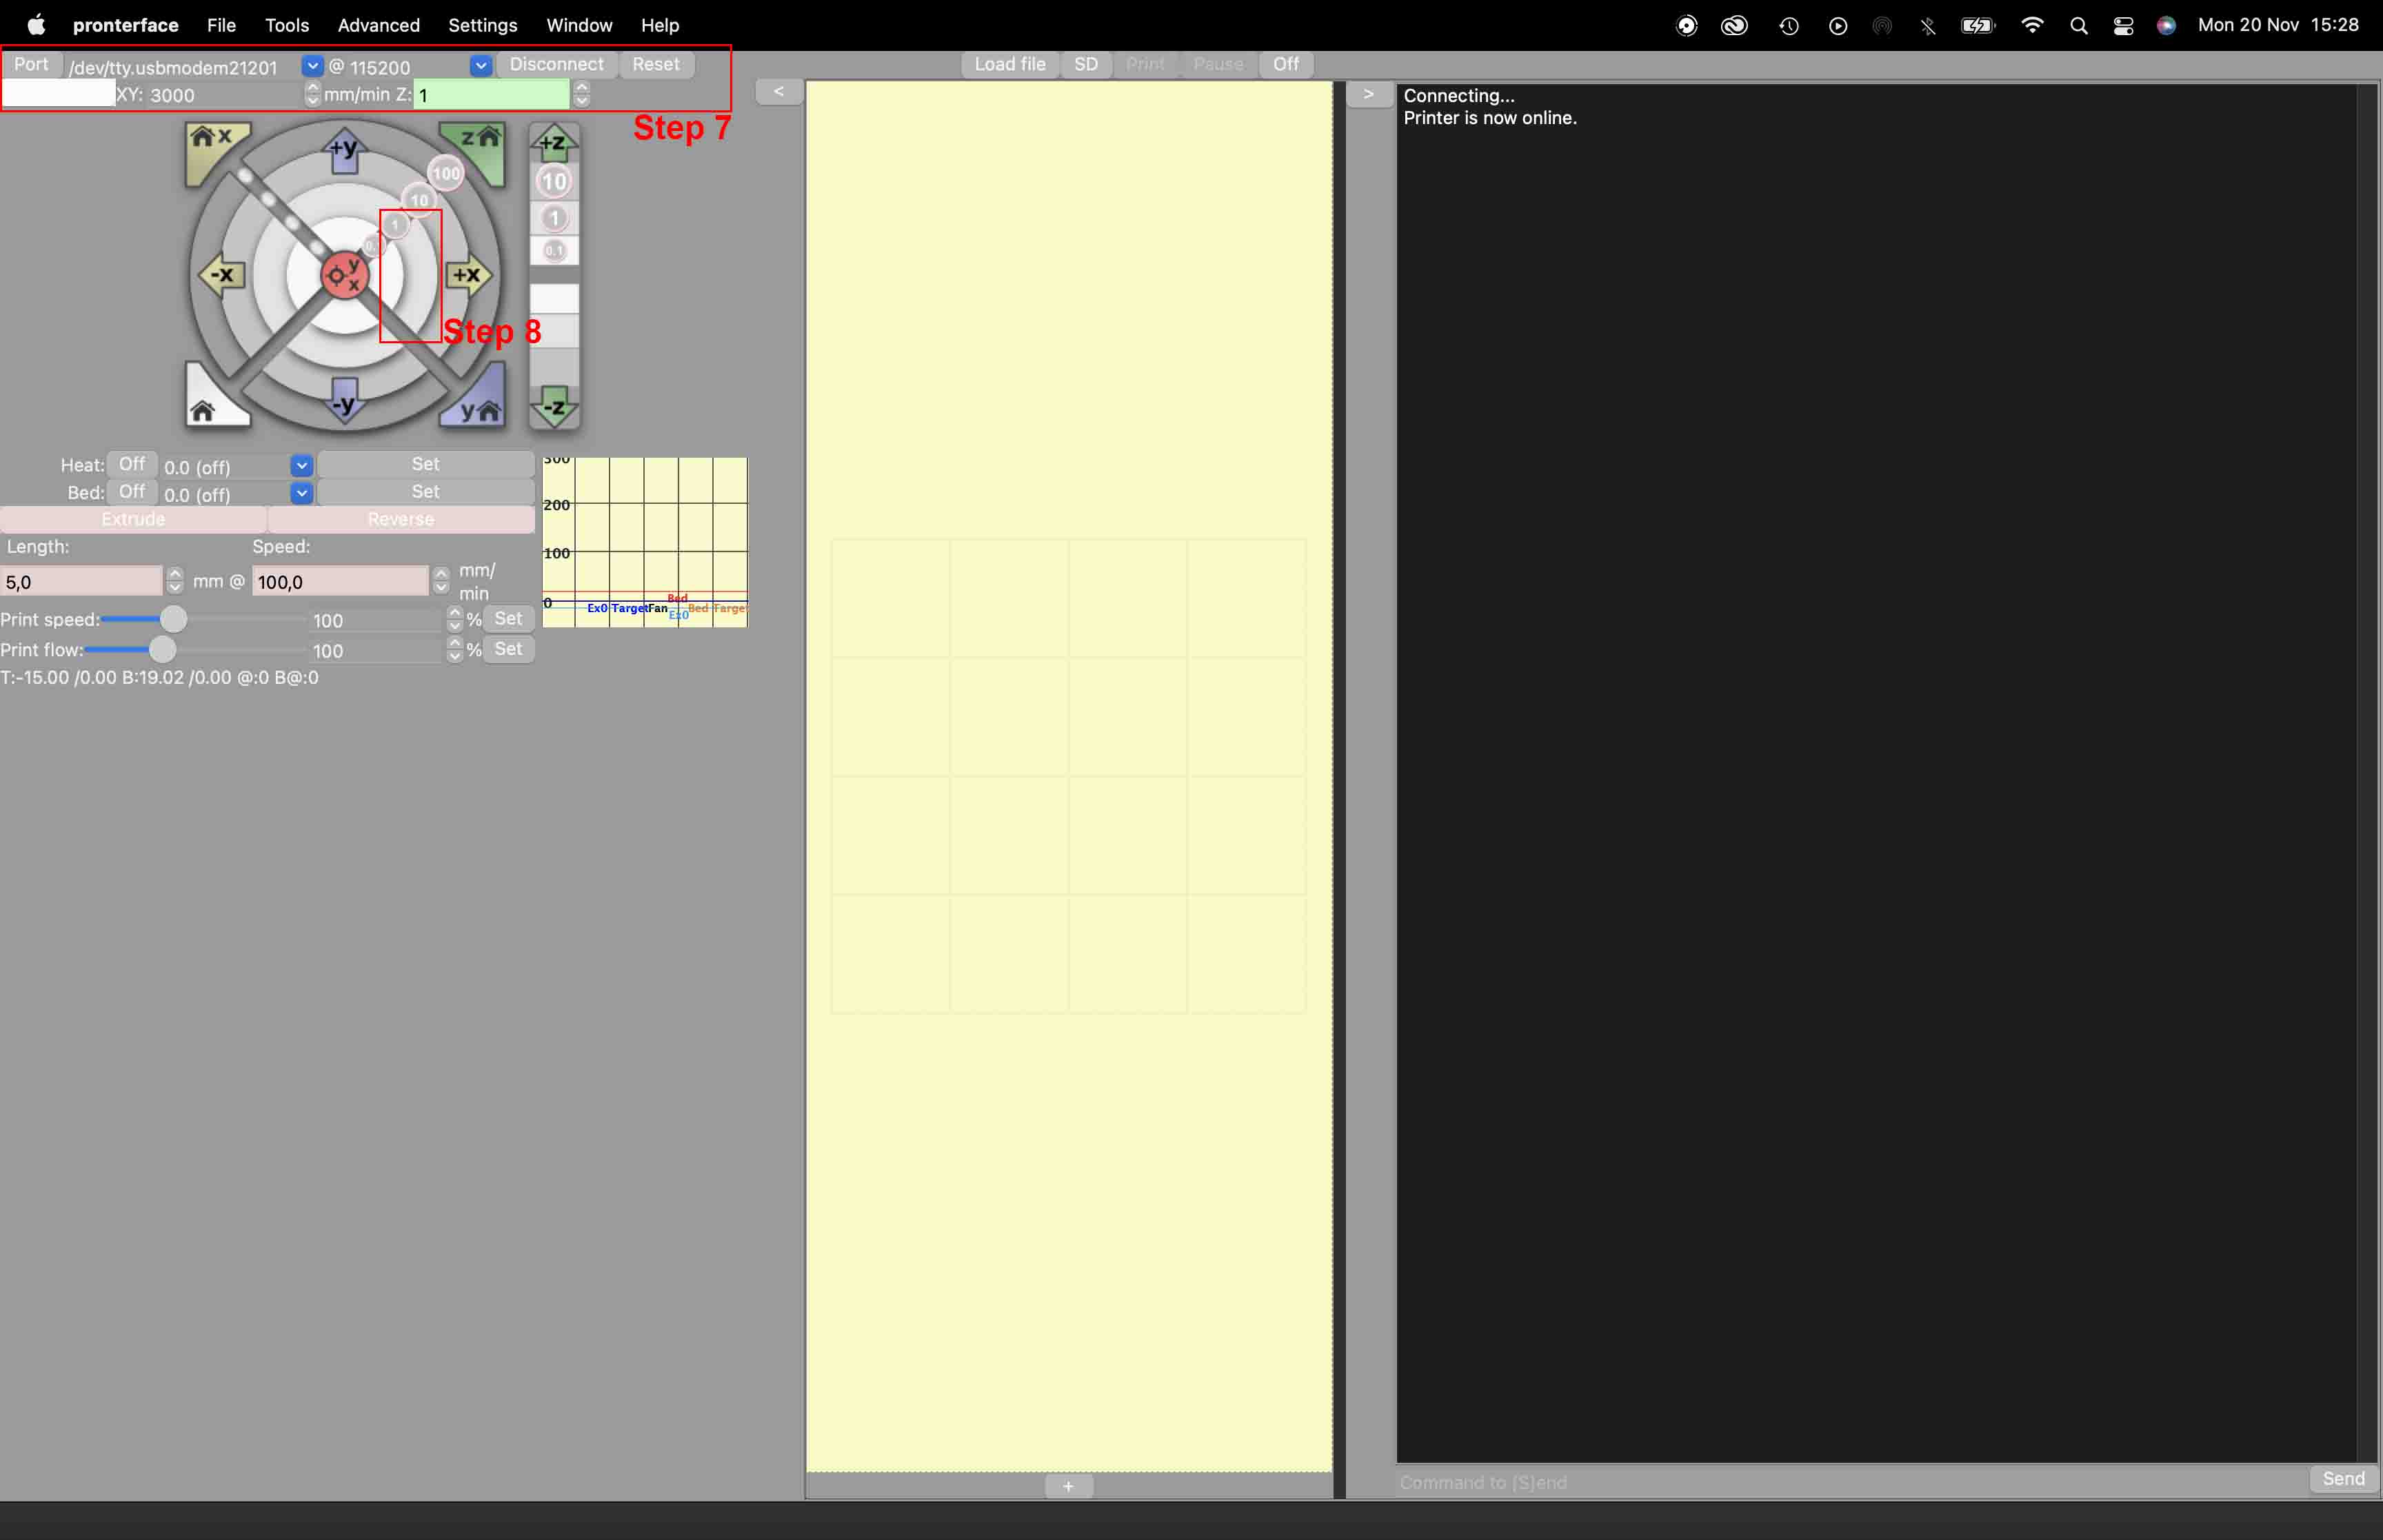
Check if the printer is connected to the computer. On windows you can do this by looking at the different usb inputs in your folders window. Now you know the name of the printer. On Macbook you can do this my moving to your terminal and write the code
ls /dev. Now terminal will give you a list of all the developers on your mac. Look for a name tty.usbmodem21201 (or something similar). If you can’t find it, disconnect the printer by taking out the usb from the laptop, give terminal the code again and see if there is one developer in the list that is now missing. If correct you can find one missing; that is the name of the 3D printer. -
When having the printer connected to the computer, open Pronterface again.
-
On the top left corner you can choose your port. Now choose the port of the correct name that you just found. In my case the name is
tty.usbmodem21201. Next to the port, you choose settings of @. These need to be115200. Now click connect. If correct, you can see on the right side of the screen a window that saysconnecting... printer is now online. -
Check whether Pronterface works on your laptop by moving the head of the printer 10 mm on the x or y axis (see images below for more info)
General codes with Pronterface.
- G1: The G1 command tells your printer to move in a straight line to the location that you specify.
- X, Y, Z: In pronterface you can use X, Y, or Z values to tell the printer what position to move to.
- E: The E value tells the printer how to move the extruder. The E value corresponds to the position of your filament spool, so if you move the E axis by 10mm, that would cause 10mm of your filament to be pushed out of the nozzle.
- F: You can use an F value to tell the printer what speed to use for the movement.
- If you want to learn more about coding with Pronterface, please visit this website.
Print bed
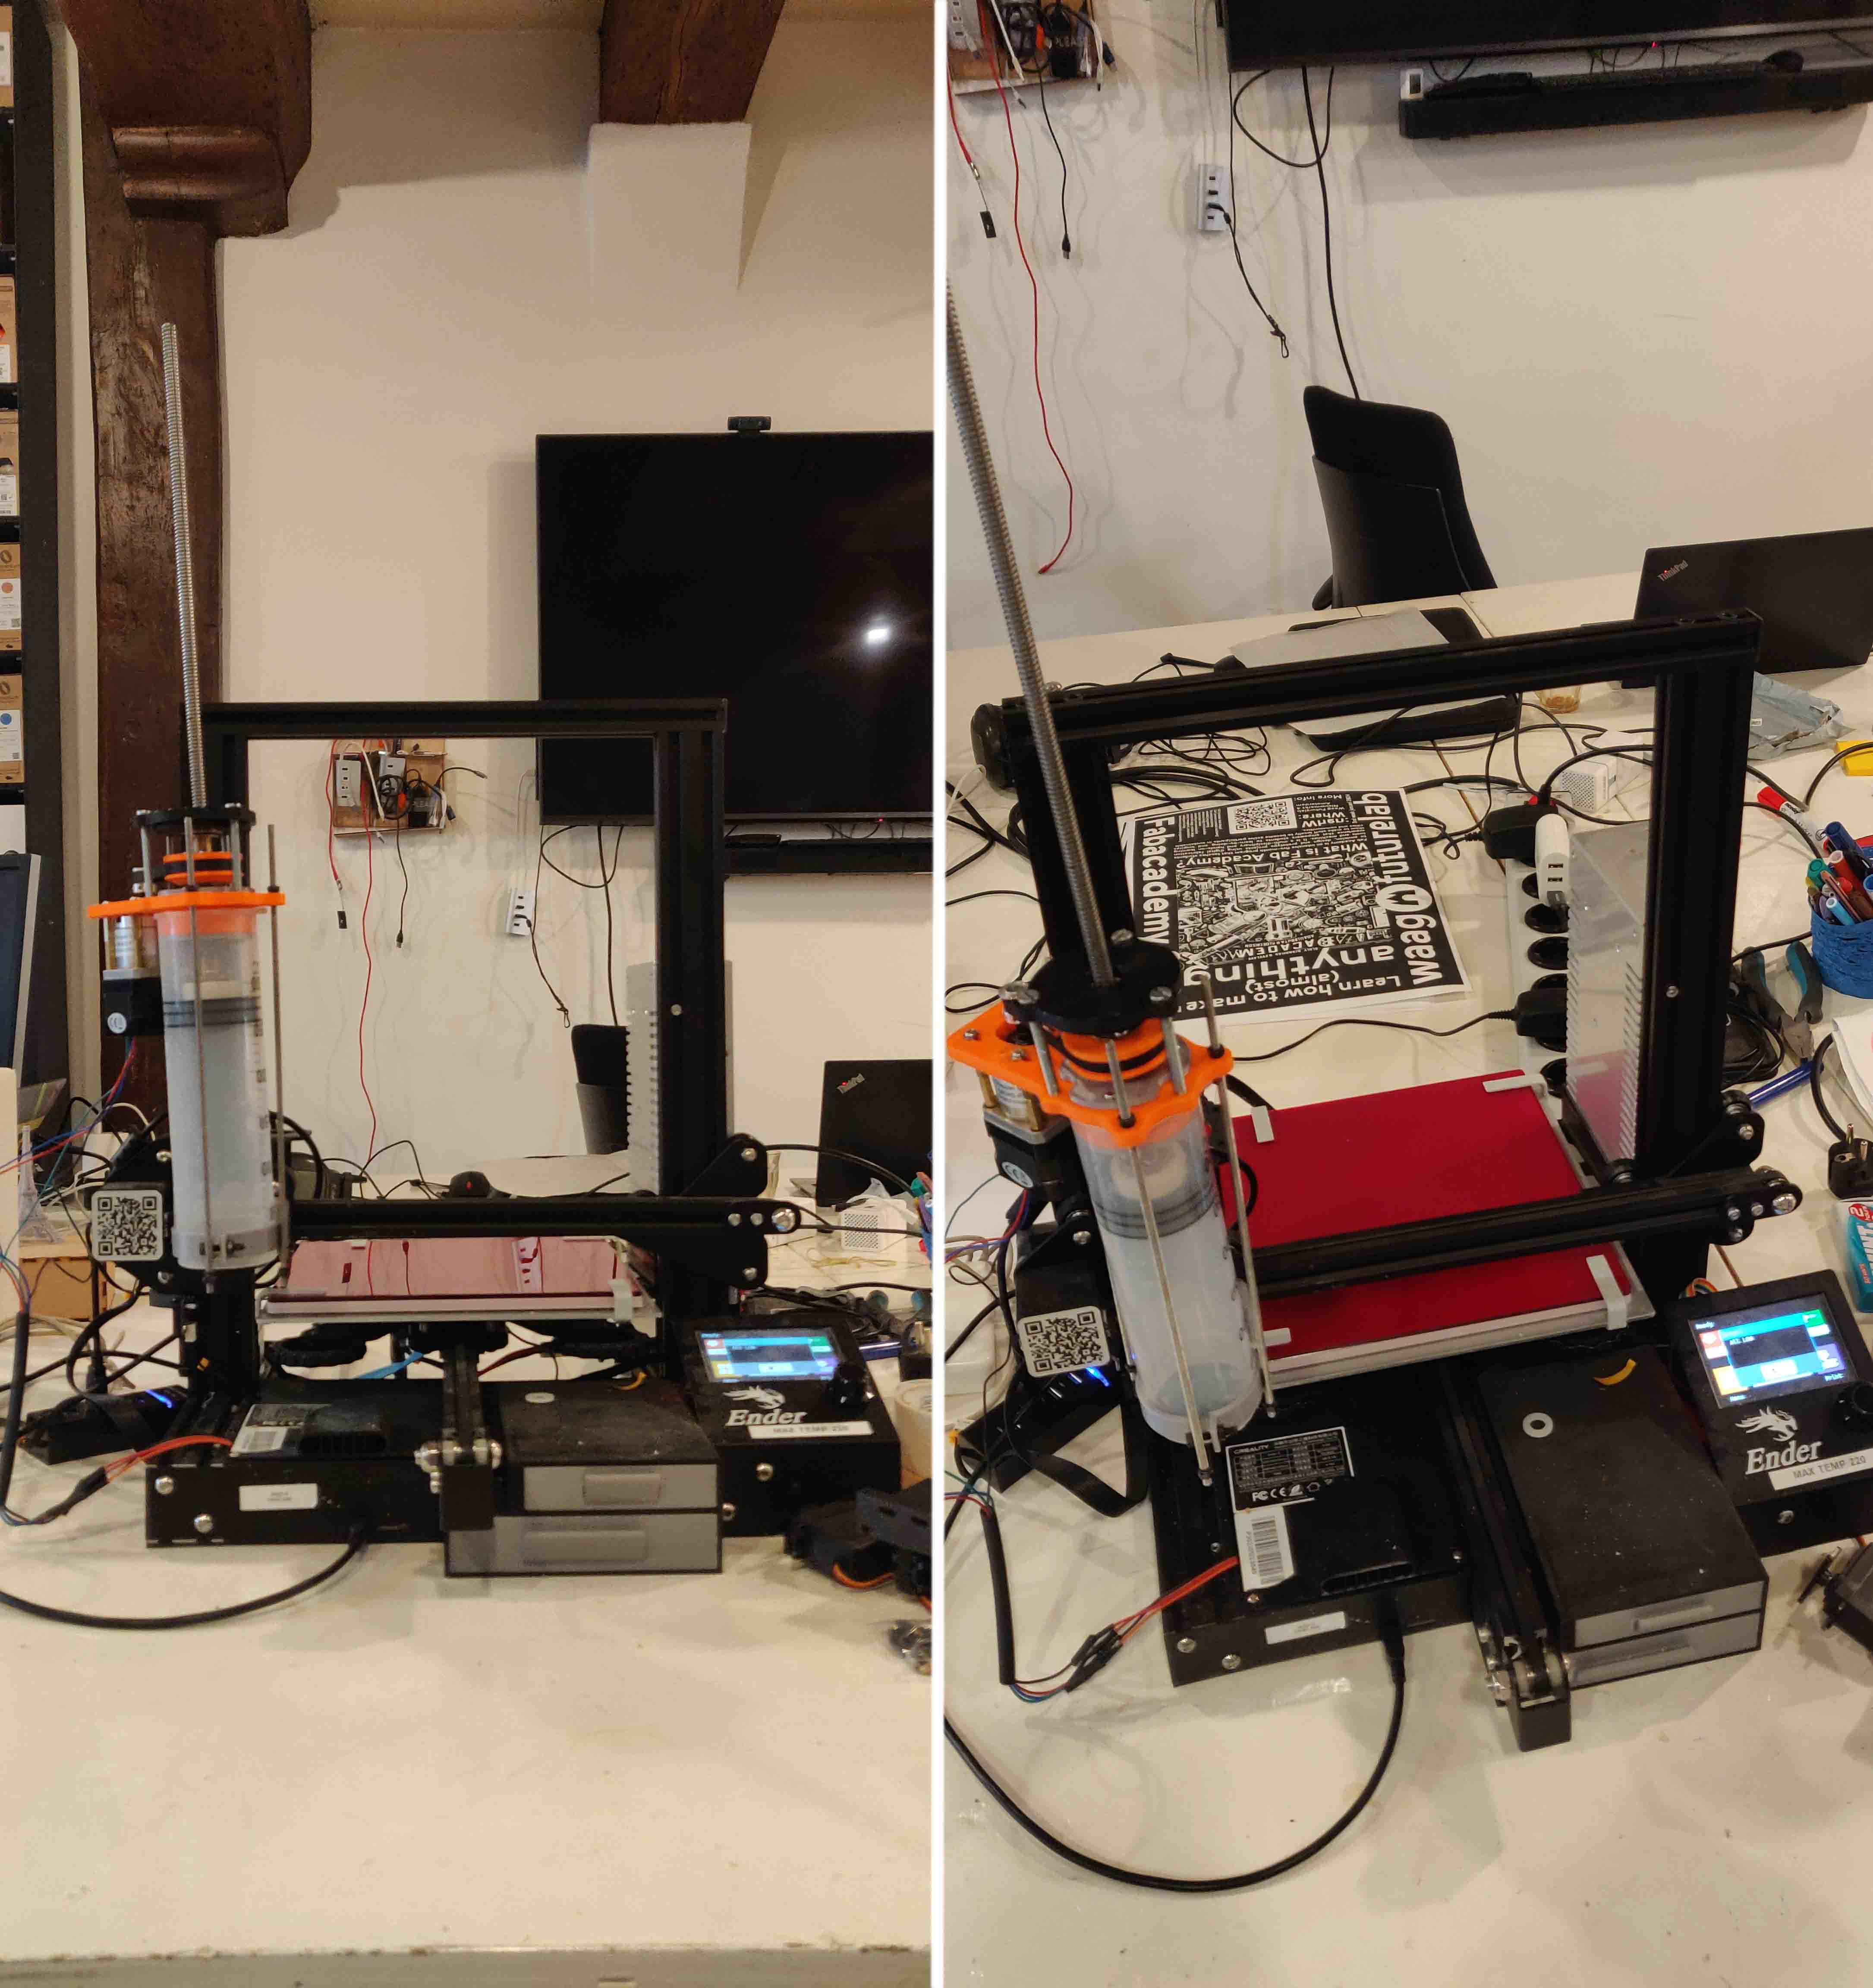
The print bed of the biomaterial printer is not like other 3D printer printbeds. It does not heat up like other beds always do since the biomaterial does not respond to heat like that. We’ve replaced the stock Ender board with the SKR Mini E3 V2.0 board. On top of that now lay 2 lasercutted vinyl boards: A white one that always needs to stay in place and 2 red ones, where you only need to use 1 of every time you print. This way you can print something and let this dry, while using the other board to print something new.
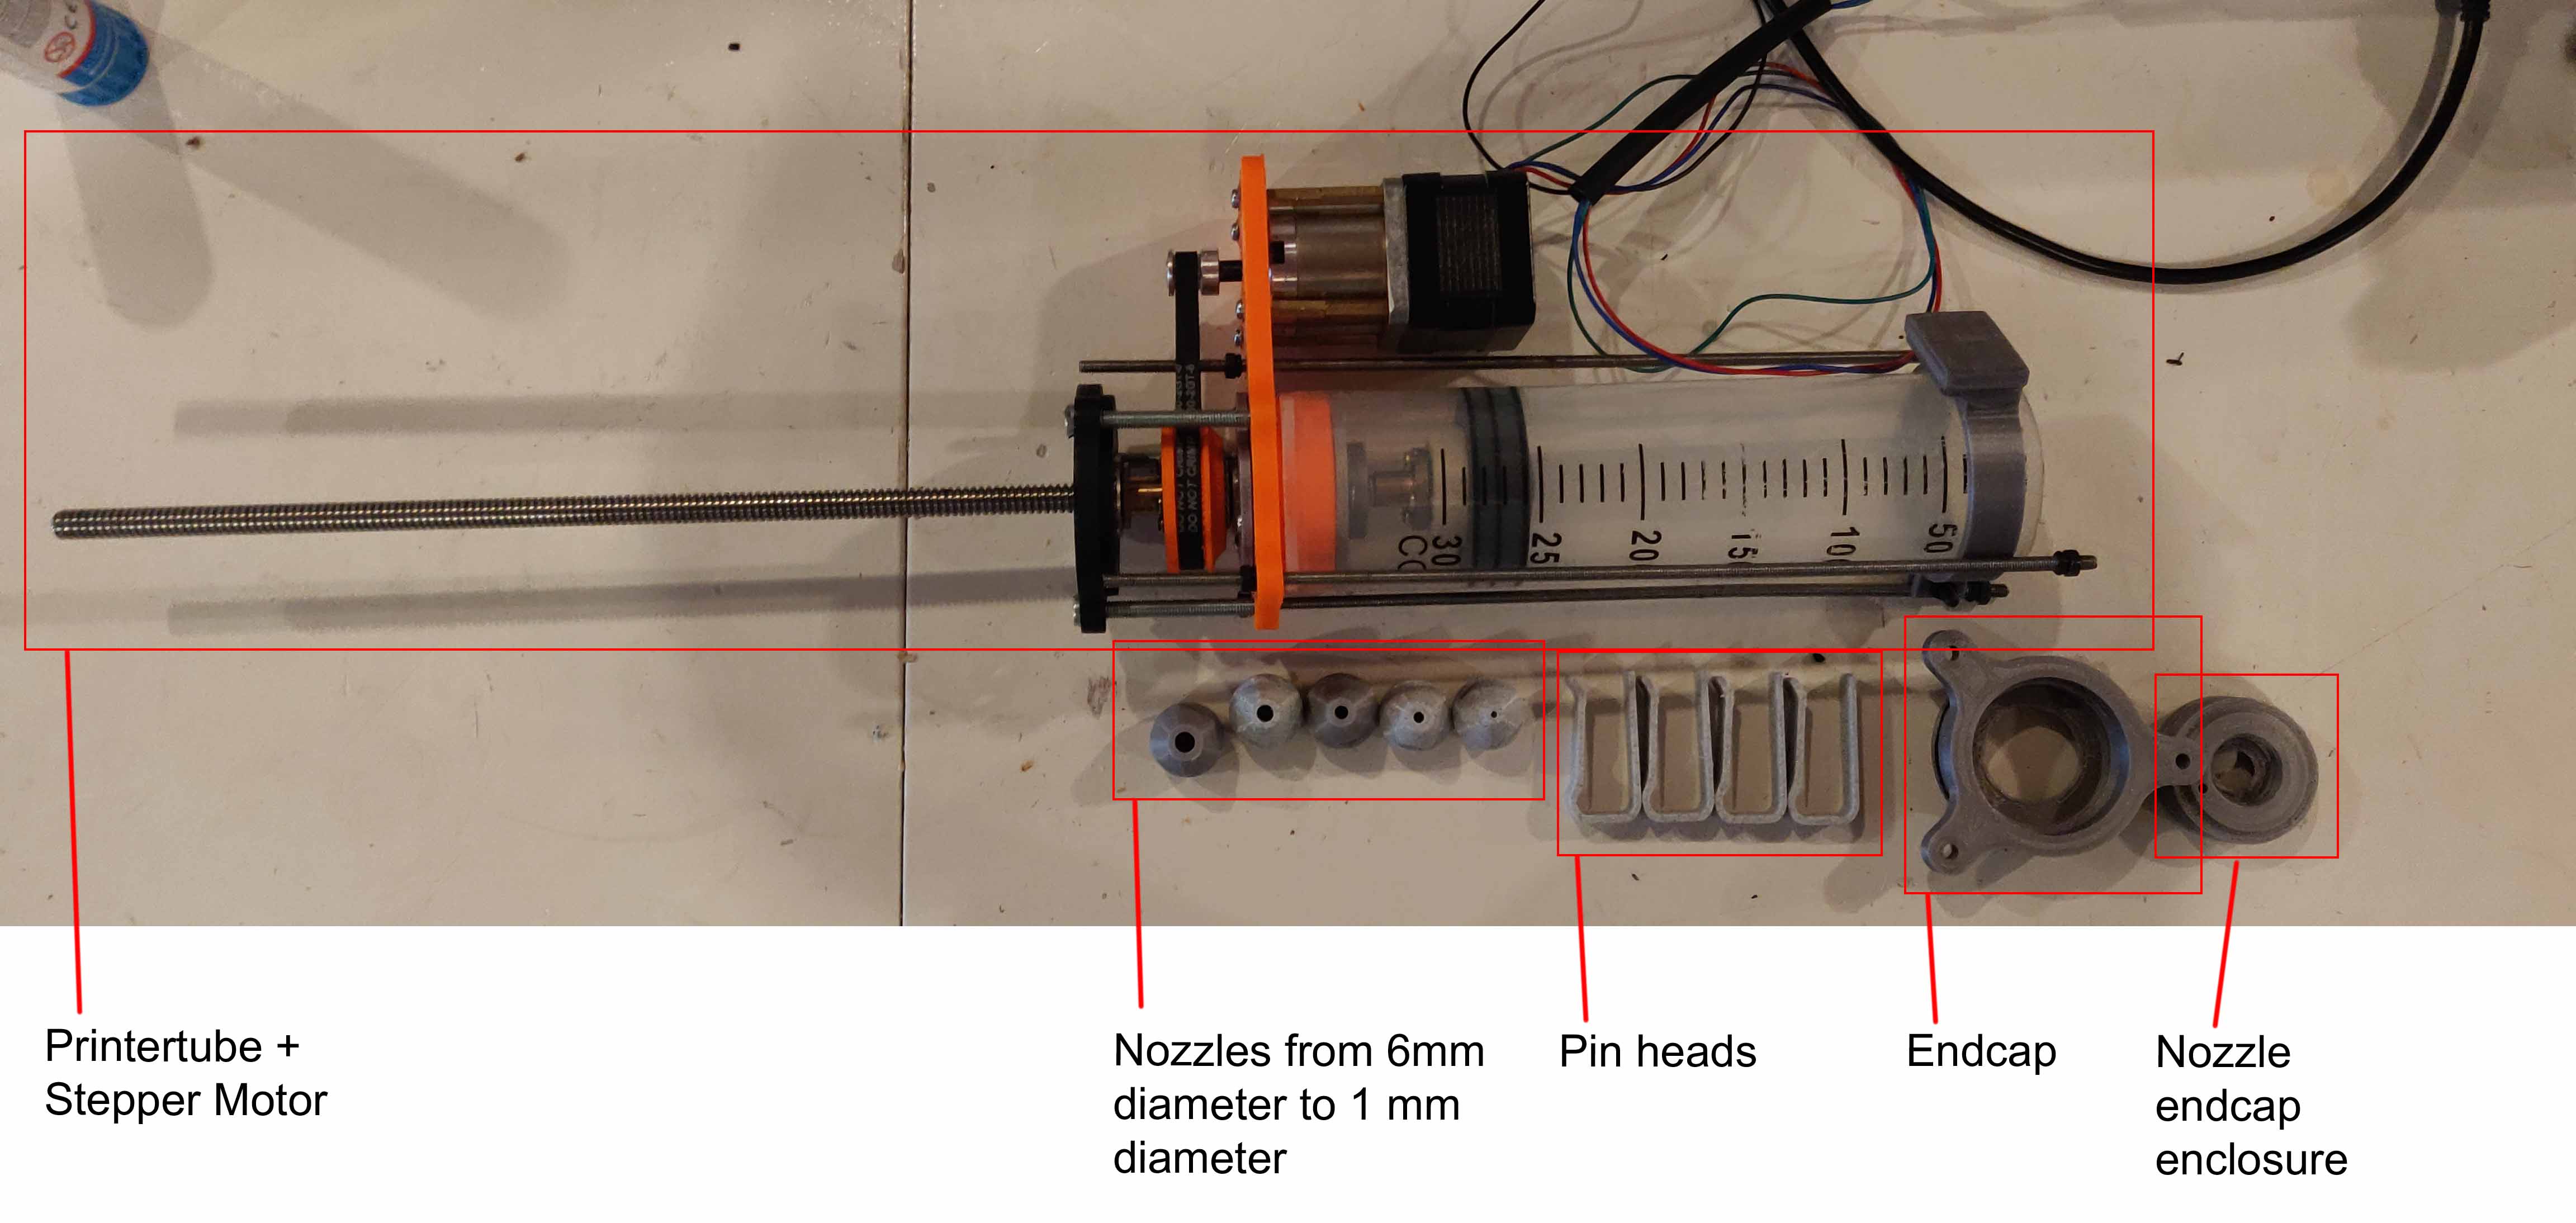
Filament extruder
The filament extruder of the biomaterial printer is also not like other 3D printer extruders. Like the print bed, it does not heat up to melt the biomaterial, but it pushes the biomaterial out of a tube that is connected to the printerhead. Depending on the biomaterial you use, you should change the nozzle on the extruder to different sizes. Keep into account that the paste you make needs to be very smooth. Little chunks can clog the extruder.
Filament roller guide
For the 3D printer I have used different sorts of recipes as filament. They were based on either sodium alginate or celulose powder. In my experience, to print with the biomaterial printer, you need a solid and thick paste if you want to create height. If you want to print more lace patterns, you can print with a more liquid paste.
Links
For links on different sorts of biomaterial recipes, have a look here or here
How to Use
This 3D printer is an altered Creality Ender 3 printer that is turned into a biomaterial printer. This documentation shows using this printer through Pronterface.
General information
As of 2023 the Creality Ender 3 has been changed into a dedicated biomaterial 3D printer. On this page you can read more about the steps on how to use the printer. Under the page hardware, software & mods you can find information on different biomaterial recipes and the software Pronterface. If you want to start 3D printing with the biomaterial 3D printer, please visit that page before you will go through the steps here.
Printer components
How to use
- You have a paste ready and have installed Pronterface and connected the software to your computer.
- You need to create the .gcode of your 3D model. This you can do through PrusaSlicer. In PrusaSlicer you do the following: You open a new project. This should be an 3mf file that contains the altered printer settings. Make sure to correspond the settings with the right nozzle size. See for all the different printer settings the files at the bottom of the page. After opening the 3mf file, you need to import your 3D model. This model you can now slice and the .gcode that is created you need to save on you laptop.
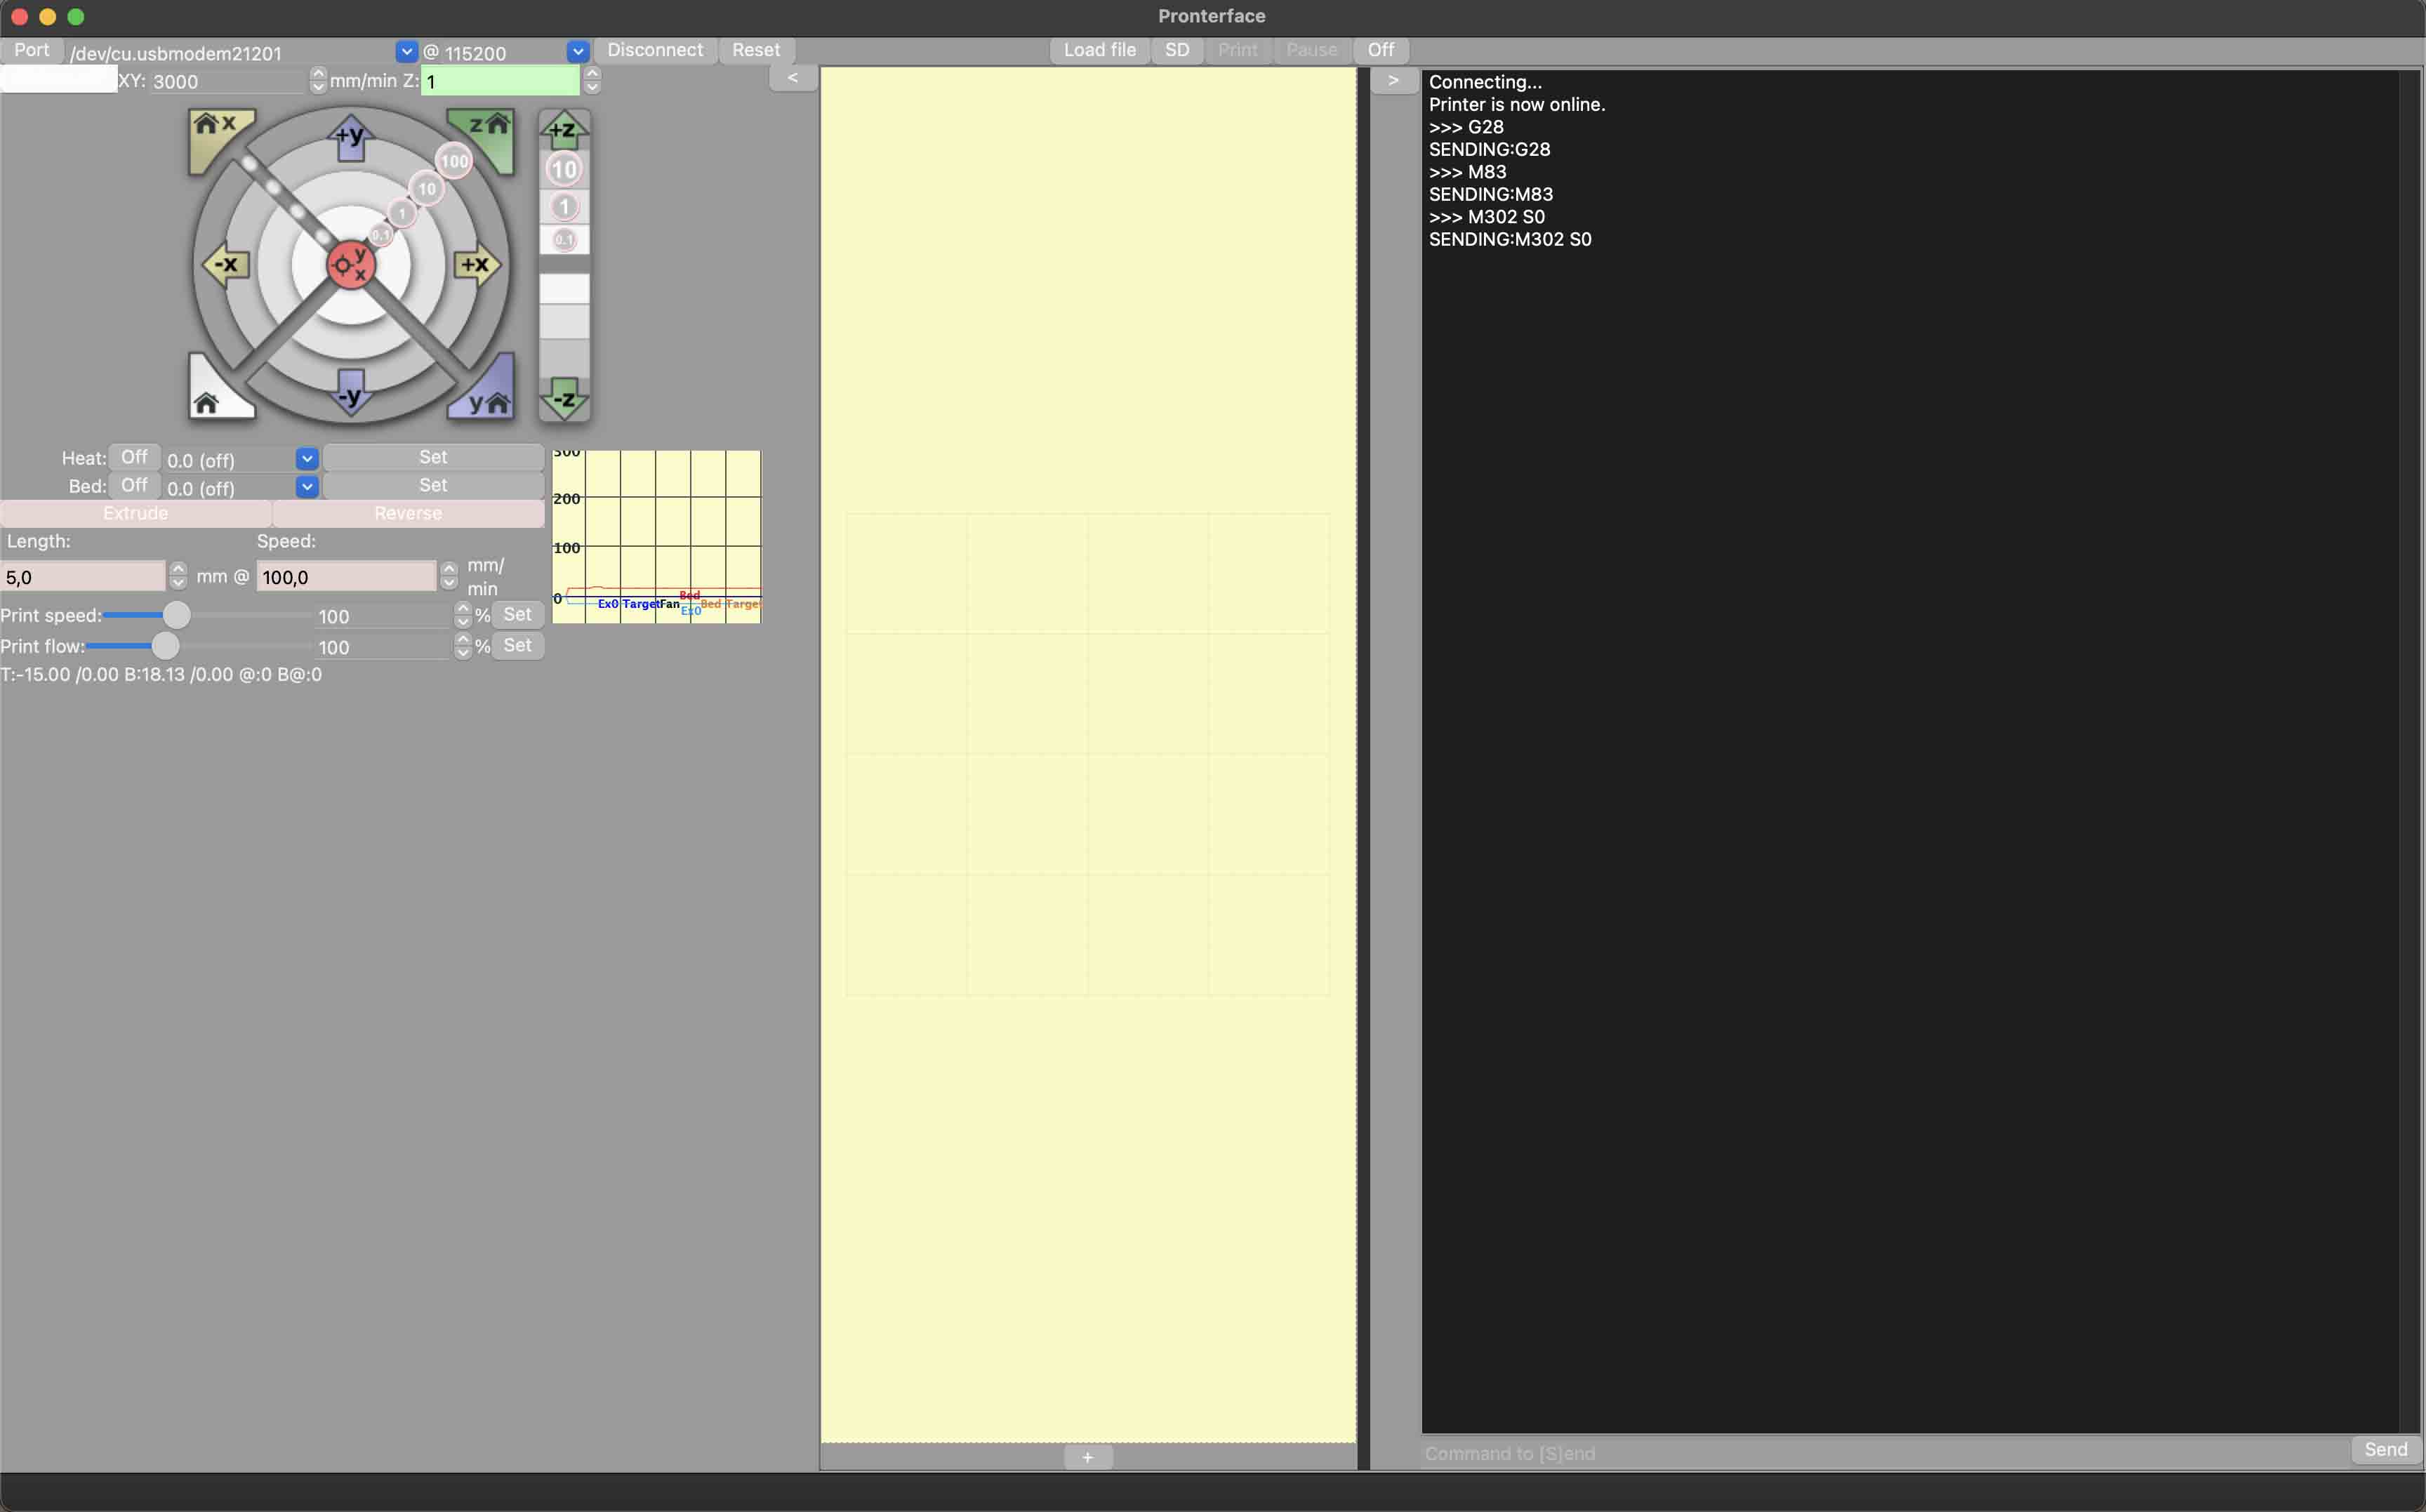
- When the computer and the printer are connected type into Pronterface the following code:
G28This will home all axis. If correct you should see the bed move to the back and the tube move to the left side (see pictures below).
- Now type:
M83andM302 S0. By typing these codes you tell the printer to be in extruder relative mode and to always allow extrusion. Now the printer understands it needs to extrude the paste.
-
Take the tube off the 3D printer and fill it with paste. Make sure when you fill it with paste that you don’t leave any bubbles in the tube, this can cause irregulatories in the print.
-
When you have filled up the tube, put back the end cap and the nozzle. If your paste is very fluid, the paste might drop out of the tube. Tape the end of the nozzle to prevent this. The end result should look like the image below.
- Put the tube back on the 3D printer. You can put a bit of paper in the sliding mechanism to prevent the tube from wiggling too much:
- Now in Pronterface click on
load fileand load the .gcode that you created with PrusaSlicer. - Now click
print. The machine is supposed to start printing your model. Make sure you take of the tape on the nozzle to make sure the paste can be extruded. - Keep a bit of paper towel near the machine. While starting to print you need to take off the tape. Now the paste can start dropping out of the nozzle head. Keep the paper towel near to make sure you keep the printer clean and no paste falls on the printer itself.
- When printing, do not be discouraged by the first layer. Always let the printer continue for 2 layers, the first layer is often not perfect, but the second layer makes up for that. See some images of the process I had below.
- When the print is done, type in Pronterface again the code G28. This will bring the machine back to the home position.
- Now you take the tube off the 3D printer, open the tube by taking off the endcap, the nozzle endcap enclosure and the nozzle. Disassemble the three pieces and wash thouroughly (especially the inside of the nozzle - you can use a needle if needed). Now use paper towels to clean the tube. Be careful with the electronical wires that connect the steppermotor & tube to the machine. DO NOT USE WATER TO CLEAN THE TUBE! Also, make sure that you keep the nuts and their rubber bands in a safe place so you won’t loose them. I always screw them on the top with the other nuts. See picture below at point 15.
- When everything is clean and dry, place the tube back on the 3D printer.
- Now you need to retract the extruder for the next usage. This you do by typing
G1 E-600 F1200in Pronterface. You retract 4 ml per time that you send this code. Depending on how much you need to retract, you know how often you need to send the code via Pronterface to the printer. - When everything is clean and the extruder is retracted, store the machine like the images below.
Notes
- If you want to learn more about the altered model of the Creality Ender, we have used the prototype of Reflexlab. You can check them out on Instagram. If you want to 3D print their models to create your own creality ender, click here and for their Bill of Materials (BOM) please look here.
- If you want to learn more about coding with your 3D printer, please visit: https://www.simplify3d.com/resources/articles/3d-printing-gcode-tutorial/
- The smaller your nozzle, the smoother your material needs to be. In order to prevent the tube from being clogged, you can first push the material through a syringe manually. This often already breaks down or filters out the little clumps that are hidden in the material.
| Nozzle settings | |
|---|---|
| 2mm | Click here to download the file. |
| 3mm | Click here to download the file. |
| 4mm | Click here to download the file. |
| 5mm | Click here to download the file. |
| 6mm | Click here to download the file. |
| Testfile - cup | Click here to download the file. |
| Most succesful biomaterial recipe | Click here to download the file. |
My outcomes and process in writing this documentation
Below you can see some of the pictures and video’s that show the process of me going through the printer.
I started with understanding the printer and pronterface. I looked up different sorts of codes for 3D printers and I watched tutorials on how to work in pronterface. Then I decided to make the easiest 3D design: a cup of 40x40x40mm with walls of 5mm thick. Trying to print this had many errors.
After successfully printing the cup, I decided I also wanted to try to print with thinner extruders. The current extruder was 4mm wide, I wanted to print with 1,5mm wide. Therefore I altered the stl files of the printerhead and 3D printed nozzles with different sizes as well. I created a range of 6, 5, 4, 3, 1,5 mm wide. See the result of that below as well:
While printing the new nozzle sizes, I created a bed on the 3D printer that looked nice and had the right thickness for the z-axis. After lasercutting this and adding it on the printer I created little clips that could hold the bed + additional plates together. These I also 3D printed. After that I created the settings in Prusa Slicer to be able to create .gcodes for the biomaterial prints. However, this seemed harder then I expected. I had to wait for the nozzles to be printed, after which I individually tried out different settings untill I had them right. All nozzle settings can be found above in the documentation. See below the results of the printer plates and the little clips
After creating new nozzles sizes and the connecting printer settings, I could try out some prints. I tried different things, such as little buttons, XR logo’s, cups, lace patterns and XR cups. The result of that you can also see below.